Welcome


Welcome to The Blue Ribbon - Youth Livestock Projects blog. The purpose of this blog is to provide information, advice and suggestions for improving youth livestock projects from multiple sources. The information, advice and suggestions in this blog come from professional agricultural educators who have multiple years of experience working with youth and their livestock projects. If you ever have a question or a particular subject you would like addressed, please feel free to contact Scott Stinnett via email, or leave a comment and we will do our best to assist or address the subject. Should the question or subject be more technical, we will help direct you to an appropriate resource for the best possible answer.

Thank you,

Scott Stinnett and The Blue Ribbon Contributors

Wednesday, May 19, 2021

The Good and Bad of Mud

When we are raising livestock, mud can be both friend and foe. When it has been dry, mud is a sign of some much needed relief. When mud seems to be a constant, it can be a hiding place for a lot of problems. Having the right amount of mud at the right time is what we would like to see. 

Mud is our friend mostly during the dry and hot times of summer. Mud is one of the most basic ways to maintain or treat dried and cracked hooves on your livestock project. Hooves are made of keratin the same protein that is in our fingernails and toenails. In hot and dry conditions, hooves lacking adequate moisture can begin to crack and split. This cracking and splitting can lead to an open invitation to infections in the hoof and foot. It can also create soreness as the hoof becomes tender. You can use hoof conditioners to treat the dry hooves or you can simply create a little mud. I like to overflow stock tanks and create muddy spots animals must stand in to drink. Animals will come to drink several times a day and standing in the mud can act as a natural hoof conditioner and help to maintain moisture in the hoof. The key is to keep the area slightly muddy where it does not dry out, but not so muddy animals sink in above the hoof. Muddy areas should also be areas free of manure. Muddy manure can invite some pretty nasty bacteria, fungi and viruses to hide and wait to attack a healthy foot. 

Veterinarian checking a hoof for infection.

For your swine project, mud is a great skin conditioner, sunscreen and insect repellent. If you have been taught to keep pigs clean and mud will stain white skin, that is correct. But the upside of mud for pigs is it helps lock moisture into their skin. Think about people who go to a spa and get a mud facial. It works the same way for pigs. A layer of mud and the dirt it leaves behind when it dries, is a great sunscreen and insect repellent. It coats the skin and filters sunlight helping prevent sunburns. It also can provide a layer of protection from biting insects like flies.

A pig enjoying a mud wallow.
Mud can be a foe when there is too much. Wet winters can be the worst at making and keeping mud. Low temperatures and a lack of sunlight prevent mud from drying out and it seems like mud never goes away. Even though hooves need moisture, too much can cause hooves to become soft and instead of cracking, they can tear or become sensitive. Softer hooves also allow bacteria, fungi and viruses in the environment to get into the hoof and foot creating infections. 

Excess mud attached to wool and hair adds extra weight on and animal. In the cattle industry, mud attached above the legs on the body is called a tag. Large amounts of tag mud can actually reduce a calf’s rate of gain in a feedlot so think about what it can do to your show project. 

Feeder calves with tag (mud).
Photo Credit: ag.ndsu.edu
Controlling mud is the key to making it your friend and not your foe. Design animal pens where moisture can drain away and allow them to dry out. Provide a dry place for animals to rest out of the mud during wet weather conditions. When it dries out, provide a place for some mud to be created for animals to stand in or for pigs to wallow in. If you can control when and where mud is available, it can be a great help to your livestock projects.


Scott Stinnett
Area Extension Agent
Kit Carson County
Golden Plains Area
Colorado State University Extension


Friday, May 14, 2021

Safe Swine Handling

Handling swine can be a bit of an adventure to a first time pig owner and even a bit challenging for those who have raised pigs for several years. Unlike cattle, pigs cannot be easily worked in alleys and chutes. Even goats and sheep can be controlled by hand easier than a pig. Learning to use a few simple tools can make swine handling easier and most of all safe for pigs and people.

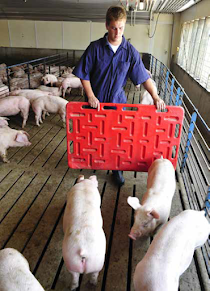
Moving pigs is usually the first task to learn how to perform and can be done easily using some basic tools. First is using a swine board or sometimes called a sorting board. A swine board is made to be tall enough a pig cannot see over it and wide enough to match at least half of a mature pig's body length. It can be made of wood metal or plastic. Swine boards are used as a portable wall. When moving pigs out of a pen or in an alley way, a swine board visibly blocks off a path of travel for a pig. If the pen or alley is wider than one swine board can block adding another person with a swine board is best.

It is best to use the swine board to do one of two things. Swine boards can be carried behind a pig or group of pigs to encourage them to move away from the board and in the direction you want them to travel. Boards can also be used to help stop or turn a pig. By placing a swine board across an alley just past a turn, a pig will naturally walk toward the board, see their path is blocked and usually make the turn you want them to take.

Photo Credit: pork.org

Other tools include a paddle, flag, cane or driving stick. These are similar to a show stick and are used to drive a pig in a direction by either blocking their direction of travel or lightly tapping on the opposite side of the body from the direction you want them to travel. As they learn about these items they can then be used as a visual cue and just placing the item in the pig's vision will cue them to turn away from it and travel in the direction you want them to go.

Photo Credit: grandin.com

When it comes time to restrain a pig to give an injection, draw blood for a vet check, or ear tagging, there are few options. The easiest method is using a snout snare. A snout snare can be either a commercially purchased item or can be homemade. A snout snare works when a pig opens their mouth slightly and the snare is placed around the upper jaw and snout. When it is pulled snug, a pig cannot back out of it and can be secured for tagging, giving an injection or other veterinary procedure. 

At first look, a snout snare appears to be restricting the pigs ability to breath out of their nose. A properly placed snout snare fits under the upper jaw and over the nasal bone and does not block off any of the pigs nose or nasal passages allowing them to breath normally.

Photo Credit: Virginia Tech, OUV


When using a snout snare, time is the key. If you need to snare a pig to give it an injection of medication, get all of your injection supplies ready first. Then snare the pig, give the injection and release the pig. A pig should be in a snare for less than a minute for tagging or injections, but may need to be secured longer for other veterinary procedures. Snares are not hurtful to a pig, but a pig does stress a bit due to being restrained. The less time in the snare, the less stress on the pig.

As with any other animal, slow and quiet handling is best and creates a low stress situation for pigs and people. Pigs are relatively fast learners and adapt quickly to being moved with swine boards and other driving tools. They also learn what a snare is and will avoid them when they have been used multiple times so use snares only when necessary. 

If you have questions about handling pigs or any other animals, contact your local Extension office.


Scott Stinnett
Area Extension Agent
Kit Carson County
Golden Plains Area
Colorado State University Extension